UiPath: Understanding Roles & Robots
A Guide to Users, Roles, Permissions, Robots and Machines
In UiPath, the act of setting up users, machines, and robots is called provisioning and it’s one of the most confusing things about getting started as a UiPath developer. In a large company, this responsibility is ceded to the System Administrator. But as learners of UiPath, we have our own instance of the platform, the Community Edition (CE), so we have to do provisioning ourselves.
We could just follow along a tutorial to set up a machine, user, and robot, but in a few months, when we need to set up or modify something, we’ve forgotten everything. So let’s first understand on a high level what these entities are, what they do, and how they’re structured. Then, create a cheatsheet that we can refer back to as needed.
What Comes Out-of-the-Box?
Let’s start by seeing what’s created automatically after each step in the installation process.
UiPath Platform Initialization
When you go to UiPath.com to Try UiPath free, and follow the steps, you are asked the following:
- Your Email (this becomes your login ID)
- Your Password (or log-in framework)
- Your Account Name (for demo we will use GI Joe)
- Your Organization Name
- Your Country/Region
That’s all UiPath needs to add you to their platform. At initialization, UiPath creates a space for you on their platform under your Organization Name, and copies certain entities and values into it. Let’s look at the provisioning setup at this point. The structure will be the same for everyone, the new data values I’ve put in green. To keep it simple, let’s take it one step at a time, starting with the Admin Entity. Examine the following diagram:
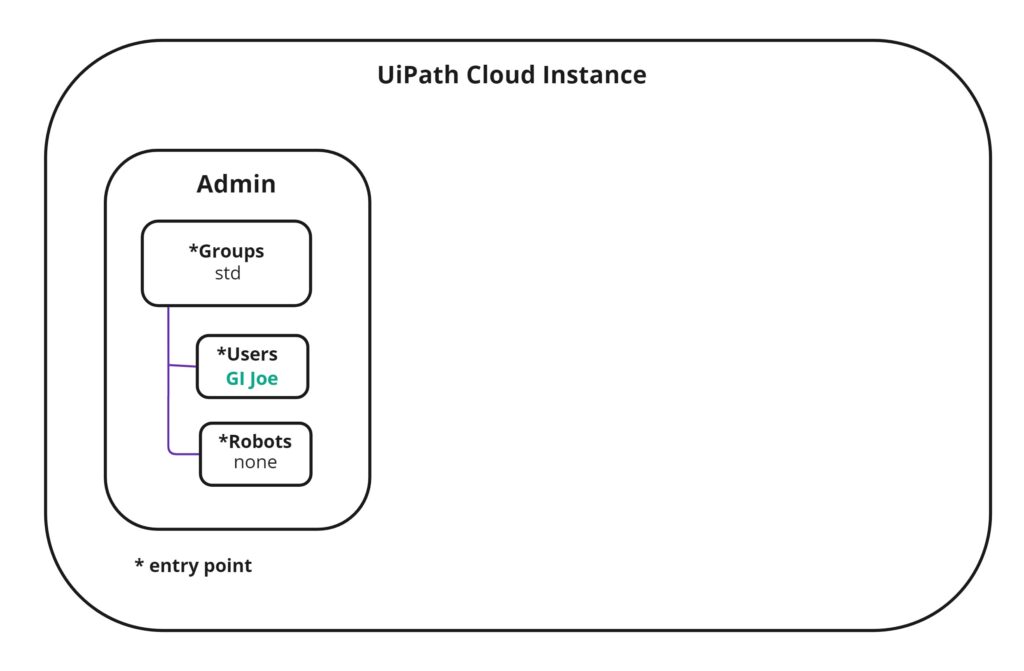
Admin Entity
After you’ve signed up, UiPath automatically creates an Admin entity within your instance, and copies the standard list of Groups within it. It then creates a space for Users, adding our one and only user (GI Joe) to it, and automatically assigns it to the Administrators and Automation Developers Groups. Notice that a place for Robots is also created in Admin, but none exist yet. A User/Robot can belong to one or more Groups, and a Group can have one or more Users/Robots. To understand what this all means, we have to go to the next step and learn about Roles & Permissions.
Orchestrator and the Tenant
Study the following diagram:
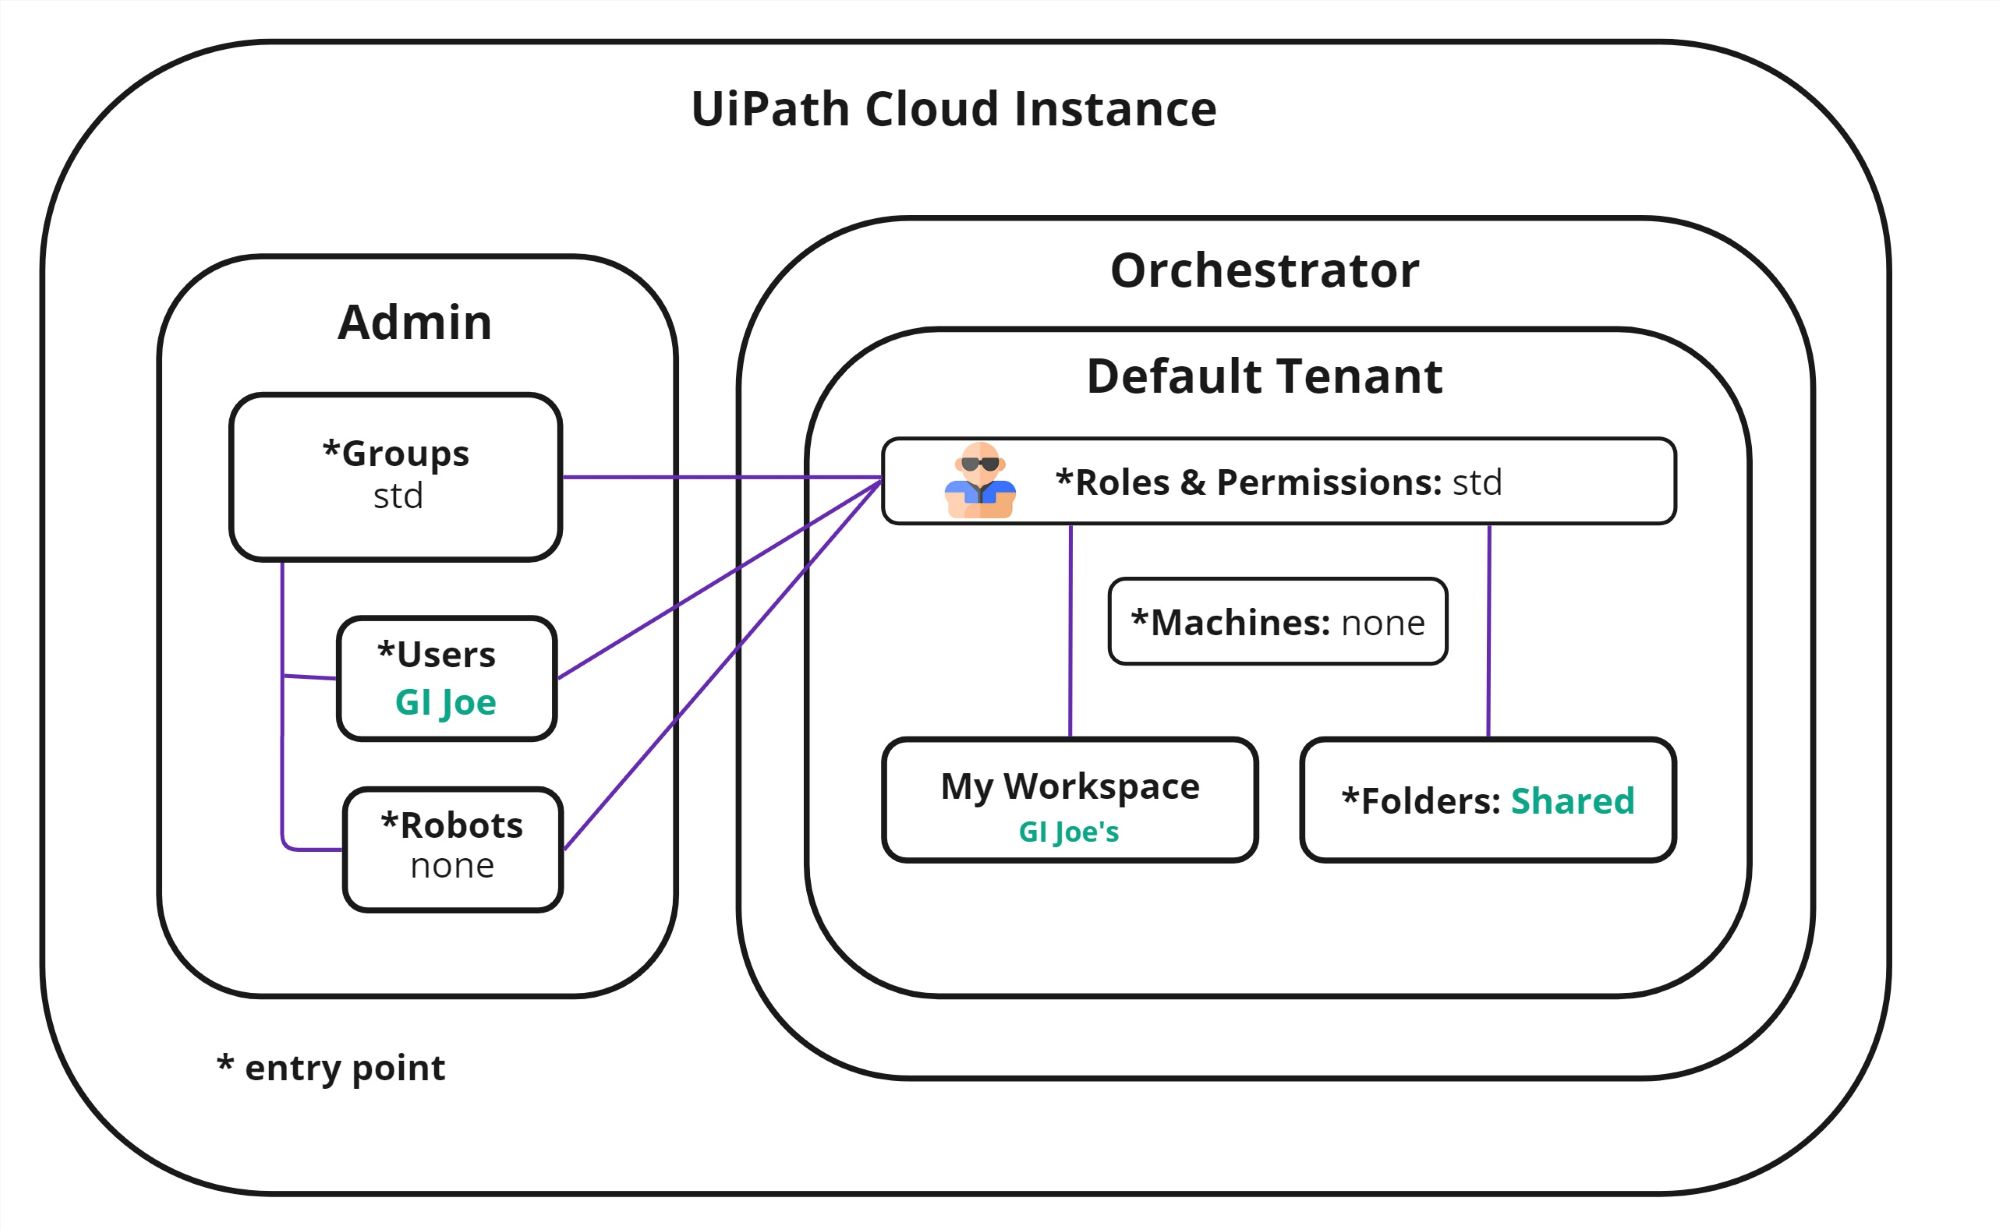
Moving on with the initialization, an Orchestrator Entity is created, with one tenant in our case, the Default Tenant. A real company would most likely have several Tenants. The important thing to remember about Tenants is that Tenants are siloed off from each other. Think of each Tenant as a separate building. Each User must be specifically granted access to each Tenant. Users still exist up at Admin Level, but are linked to each Tenant. How is that done? By Roles.
Meet Rolando, Security Dude
Think of each Tenant as a separate exclusive club that has private rooms within it. A security dude, Rolando, stands at the entrance of the Club, with a clipboard of a list of people allowed in and what they’re allowed to do while there. If you ain’t on the list, you ain’t getting in. Each Tenant has its own Rolando. Rolando’s office can be found at Tenant > Manage Access > Roles.

(at Club Default Tenant)
Roles & Permissions – Rolando’s List
At the Tenant Level, Roles are created. Each Role has a type: Tenant, Folder, or Mixed, which designates what level each Role has access to within that Tenant only. Each Role is simply a list of Permissions. Permissions grant access to specific objects in Orchestrator, such as folders, tags, logs, etc., and grants the ability to View, Edit, Create, or Delete them. Permissions are the fine-grained security system in UiPath. Permissions dictate what the User sees in each Tenant when they log in to the system, which tabs, folders, and buttons and actions are available to them. Once created, the Role is linked back to a Group, so all the users within that Group will inherit that Role’s permissions for that specific Tenant. (To be even more flexible, a Role could also be linked to an individual User or Robot.) It can all get a bit confusing, but remember that a Group is who you ARE, a Role is what you can DO. Fortunately, UiPath starts us off with a standard list of Roles, with their usual permissions, and does the linking for us. But always remember, to change or add a Role/Permission and link it to a Group/User, you must do it at the Tenant Level. You have to go see Rolando.
A Group is who you ARE, a Role is what you can DO
An Example
Imagine you are a System Administrator for a company. You have several Tenants set up, one for each Department. One for Sales, another for Marketing, and so on. A new user, Kim, is a manager of the Sales Team. Kim needs full access to all of the Sales Tenant, but maybe read-only access to the Marketing Tenant. At the Admin level, you might create a Group called Sales Managers, and add Kim’s user account to it. Now, back in Orchestrator, in the Sales Tenant you might create a Role called Manager Access, give it liberal permissions, and link it to the Sales Managers Group. Then, in the Marketing Tenant, you might create a Role called Read-Only Access, give it View permissions only, and also link it to the Sales Managers Group.
Now, when Kim logs in, as a member of the Sales Managers Group, she can see both Sales and Marketing Tenants, but only has edit privileges in the Sales Tenant.
Folders
Keeping with the Tenant Building analogy, at initialization only one Folder (or room) is automatically created, the Shared Folder. The tenant level is where you create folders and grant access to them. Somewhat confusingly, it isn’t through Manage Access tab, but through Tenant > Folders tab that you grant access.
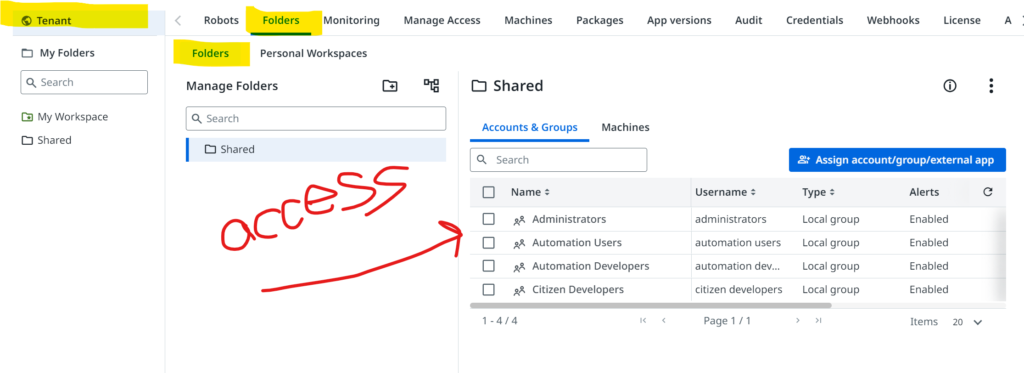
We see that UiPath automatically granted access to the Shared folder to all Groups. Because our User is a member of the Administrators Group which includes the Role of Folder Administrator, he has access to the Shared Folder. We can change this if we want. You also see a tab for Machines. But we’ll talk about that later.
My Workspace Entity
Within our Default Tenant building, a special room is automatically created called My Workspace. This is for the exclusive use of the logged in user (in our case GI Joe), and it works like a folder, but has some special differences. One difference is that any nuget package uploaded there by GI Joe automatically becomes a process which GI Joe can run. Other differences are that you cannot grant other users access to it, run tests there, or delete it. There is a way to convert a workspace into a folder later if you want, but then another brand new My Workspace would be automatically created for the logged in user. Users themselves cannot alter their own permissions in their My Workspace, to prevent accidentally disabling a core functionality. There is a way, however, for Admins higher up to set which Users get My Workspaces in which Tenants.
Machines Entity
A place for Machines is created at the Tenant level. We don’t have one set up yet, but it’s important to note that the entry point for Machines is at the Tenant level.
GI Joe’s Roles
Remember that at initialization, GI Joe was automatically added to two Groups: Administrators and Automation Developers. Each of these Groups has Roles already assigned to them by UiPath.
| Group | Tenant Roles | Folder Roles |
|---|---|---|
| Administrators | Orchestrator Administrator | Folder Administrator (Shared) |
| Solutions Administrator | Personal Workspace Administrator (My Workspace) | |
| Automation Developers | Allow to be Automation Developer | Automation Developer (Shared) |
Each of these Roles set up by UiPath has underlying Permissions. Remember, a Role is just a set of Permissions. As an exercise, go see Rolando and view the permissions for each of these Roles.
Okay. We’ve initialized Gi Joe’s instance of UiPath. Because it is his instance, he is the Organizational Admin. He is a member of the Administrators Group, so he has very liberal permissions within this instance. Without doing anything else, GI Joe can create and publish automations with Studio Web. He can run and schedule automations from Orchestrator. He has full access to the Shared Folder. He can create and delete other folders. (Keep in mind however that in a real company, a typical User would not have this level of access.) We could stop here. But GI Joe wants to be a future UiPath developer and create more sophisticated automations. So he needs Studio Desktop and Studio Assistant as well.
Setting up Studio & Assistant
On the Home page of UiPath.com, we follow the link to download Studio Desktop, and follow the installation wizard. For my setup, I selected Custom Installation and set up for All Users on this computer. In the advanced tab I checked extensions for Edge, Firefox, and Chrome. Once the install has finished, Studio, Assistant and the Robot Service are now installed on the local machine. Then, it prompts us to log in to the UiPath online instance, using GI Joe’s account. This creates the link between our desktop and the instance in the Cloud.
Up in Orchestrator, let’s see what’s changed. Study the following diagram:
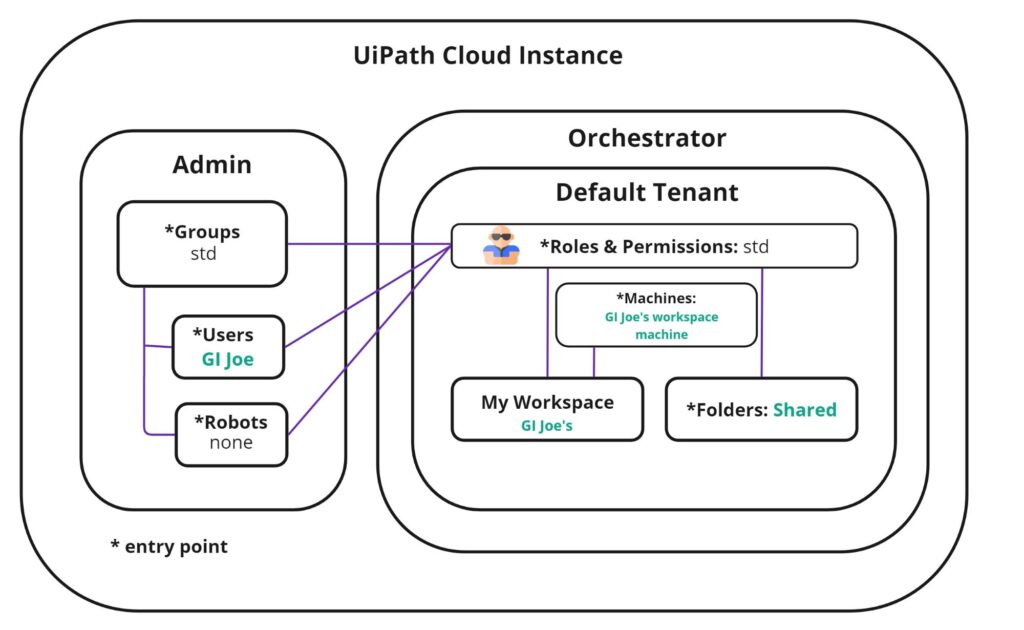
We see from this diagram that a new machine has been added! UiPath calls it GI Joe’s workspace machine, but we can change that name if we want. We can see the details in the Tenant > Machines tab.

Notice in the diagram that this machine has been linked to GI Joe’s My Workspace room automatically. Now, GI Joe has the capability of publishing a process up to his Workspace, and when he runs it, it will be run on his workstation in Attended mode.
Workspace Robot
And something else has changed. At the Tenant > Robots tab, we see a new Robot listed there.
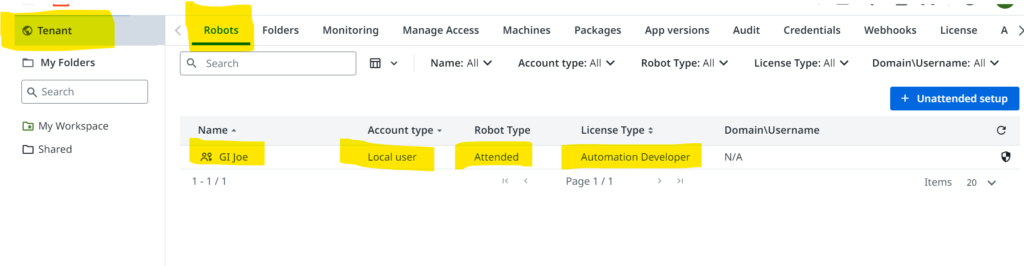
But, if we look over in the Admin Entity, our new Robot is not there. What’s going on?
This is a case where run privileges have been added to a User Account directly, instead of the creation of a new Robot Account over at the Admin level. Why? Remember that the Personal Workspace is a special, exclusive room. Only one User Account has access to it, the single User. No other Account can be granted access to someone else’s personal workspace, not even a Robot Account. So, since GI Joe the User has Personal Workspace Administrator privileges, he will be able to publish processes he developed in Studio up to his personal workspace in Orchestrator, launch them from Orchestrator, and they will run on his personal workstation as long as he’s logged in and connected. But we need to give GI Joe the ability to run unattended processes too, and to do that, we need to know a bit about licensing. Make sure you understand the basics of UiPath licensing. I’ve broken it all down here: A Brief Intro into UiPath Licensing.
Unattended Setup
Now that we have a basic understanding of licensing, let’s add that to our diagram.

To set up a Robot that will run unattended automations, 3 things must happen:
- A Runtime license needs to attached to the Machine that will host the automation.
- Log-in Credentials need to be stored with the User/Robot Account that will run the automation.
- The User/Robot Account needs necessary permissions to run automations.
In our diagram, I’ve added the Licenses entity to the Admin level. It is not the entry point for licenses, because that is set at the plan level and can only be changed by purchasing more licenses. The linking of User Licenses to Groups happens at the Admin level however, and I’ve indicated that connection in green. Keep in mind that it is also possible to connect a license directly to a User rather than a Group, and that would also happen at the Admin level. But it is considered best practice to assign licenses to Groups, rather than individual Users, for easier maintenance. As far as the Runtime Licenses go, they are linked to Machines over at the Tenant Level, and I’ve indicated that connection in green.
Notice also that User Credentials are entered and stored at the Tenant Level for each User/Robot account that is to run Unattended Automations. Credentials are the login ID and password that an Unattended process needs to log into a host machine. Storing credentials at the Tenant level, rather than with the User at the Admin level, gives the Administrator flexibility to use different credentials for different Tenants, thereby adding another layer of separation of concerns between tenants. These credentials are added to a User/Robot Account by following this trail: Tenant > Manage Access > All > [pick the account] Edit > Unattended Setup.
Setting up Machines
In UiPath, a machine is a software object that keeps track of runtime licenses, and a special, secret Machine Key. This key is what Orchestrator will listen for to know how many host machines are available, running, or offline. For more see this post. We can see from our diagram that Machines entry point is at the Tenant level. So if we go to the Tenant > Machines tab, we will be able to set up a machine or machine template there, including linking it to one or more runtime licenses.
Then, after the machine has been set up, we then expose it for use by jobs by means of the Folders tab. We link it to either our personal workspace, or to a folder there.
Final Cheat Sheet
So here’s our final provisioning diagram to use as a cheat sheet:

The asterisk tells you where to go to enter new data. It’s where the information lives. The star object tells you where to go in the system to create the link between the entities. Notice that to add a machine into My Workspace, you must start at the Folders tab.