UiPath Document Understanding Step-By-Step
A Deep Dive Into Creating a DU Process
UiPath’s Document Understanding isn’t hard, but it involves quite a few steps. Yes, there is a template that simplifies the creation of a DU process, and the online version is also a bit simpler. And now, with cutting-edge generative AI, some tasks such as classifying and extracting from a document are becoming trivial. But to really master Document Understanding, it is important to fully understand each step in the process, and how it all flows together. What follows is a deep dive into each step as done in Studio (the old fashioned way). To get the most out of it, follow along by creating your own DU process.
Prelim: Set Up DU in Studio
Before we can start to build a DU Process, we must install the UiPath packages DocumentUnderstanding.ML.Activities and IntelligentOCR.Activities into the Studio project. These packages will add the Document Understanding Activities that we will need under the App Integration group, and also add a button on the Design ribbon called Taxonomy Manager.
Step 1: Define & Load the Taxonomy
Before it can work on any document, DU needs to know what it is looking for. It receives instructions via something called a Taxonomy. Taxonomy is defined as the science of organizing and categorizing things into a structured system. In UiPath, Taxonomy is simply a JSON file that tells DU the types of documents it will read, and what data to extract from each document. Think of the taxonomy as the recipe for DU to follow. Taxonomies classify each type of document into a hierarchy up to 2 levels deep, and then defines the specific fields to look for within each type of document.
Define the Taxonomy
To create a Taxonomy file, UiPath helpfully gives us a wizard, the Taxonomy Manager. Defining a taxonomy is done by first grouping the documents in a hierarchical, logical way. For example, let’s say we are writing an automation to process invoices and receipts. We might create a hierarchy like so:
- AccountsPayable (Group)
- Unpaid (Category)
- Paid (Category)
Field Definition
After the hierarchy is defined, the second step is to tell DU what to look for in each category of document. Using the Taxonomy Manager, we simply add Fields to each Document Type, and define their types. Available types are: Text, Number, Name, Address, Set, Boolean, Table, and Table Column. So, for example:
- AccountsPayable
- Unpaid
- Invoices
- InvoiceDate (Date)
- AccountNumber (Text)
- Vendor (Text)
- TotalDue (Number)
- Contact
- Invoices
- Paid
- Receipts
- Vendor (Text)
- Date (Date)
- TotalPaid (Number)
- Receipts
- Unpaid
When setting up each field, there are also 2 toggle switches to consider: Is Multi-Value and Requires Reference.
Is Multi-Value — This tells the Taxonomy Manager how to set up the space for the incoming values. For most fields, the incoming value will be unique, one Invoice Number per document for example, and the toggle will be off. Some fields may have multiple values incoming, and need to be set up as a JSON array. For example, a set of tags, multiple contacts, or multiple addresses. When turned on, each value it finds will be added to the array of the same field name.
Requires Reference — The normal way data is validated at runtime is that a form pops up and the human has to highlight a particular area of the document to extract the field value. Forcing the user to do this is called requiring a reference. But, there is a way to add a field that might not even appear in the document at all. For example, you might set up a field ValidatedBy in the Taxonomy and set Requires Reference to false. In this case, the user could type in the value on his/her own, without first finding it in the document.
Once the Taxonomy Manager is closed, it creates the taxonomy.json file in the DocumentProcessing folder. Each project can have only one taxonomy file.
Load The Taxonomy
Once the taxonomy has been defined, use the activity Load Taxonomy to bring it into your workflow. Store the result into a variable, which will be of type DocumentTaxonomy, which you will then use as an input variable in the activities that follow it.
If you want to share a Taxonomy across projects, there are a couple of methods in the DocumentTaxonomy object you can use. The Serialize() method turns the DocumentTaxonomy object into a JSON string which can be exported and imported, and Deserialize(String) converts it back into the DocumentTaxonomy structure we need to proceed to the next step.
Step 2: Digitization – Get the DOM
Once DU knows what it’s looking for, it is set up to begin to analyze each document. If the document is in a native (typed-in) format, it can proceed. However, some documents might be scanned. Then, DU must first use an Optical Character Recognition (OCR) engine to parse the image into text. Parsing an image into text is called Digitization.
Different OCR engines have different capabilities such as recognizing handwritten text, checkboxes, signatures, barcodes, QR codes, languages, etc. See Comparison. Trial and error may be required to select the best OCR engine for your project. OCR engines are kept on the internet, and called through an API. The UiPath default OCR engines automatically connect through your Orchestrator Tenant.

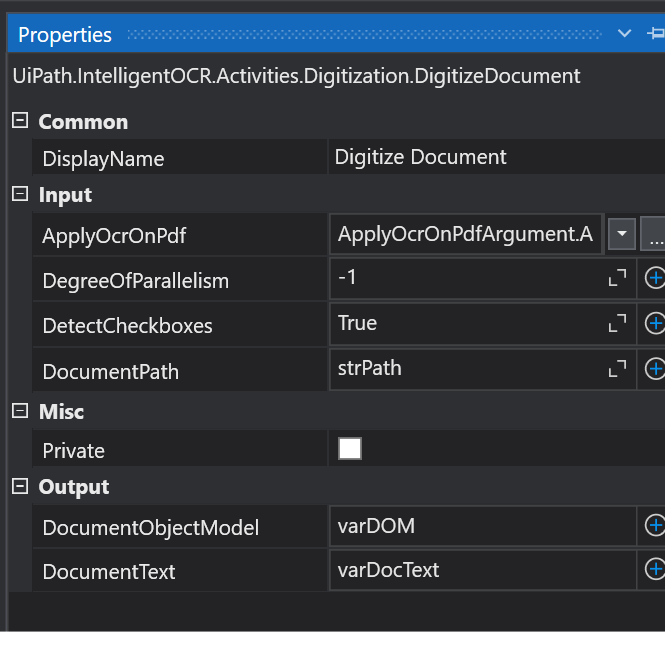
Input Properties
Adding the Digitize Document activity to the workflow, we drag into it the specific OCR engine activity that we have chosen, and the path to the document we are analyzing. An important property to understand is ApplyOcrOnPdf. This property tells DU whether to always use OCR (Yes), whether to never use OCR and only read the native text (No), or to decide for itself whether to use OCR or not (Auto). The default is Auto. If your process does not expect scanned documents, setting this to No would speed things up.
Another setting on Digitize Document is DegreeOfParallelism. This specifies how many pages can be processed in parallel. Setting it to -1 tells the DU to process as many pages as CPU cores are available minus 1. This is the fastest setting available.
Output
There are 2 outputs returned from this activity: the Document Text and the Document Object Model (DOM). The DOM is a representation of a document as a JSON-formatted object in memory. It allows programs to interact with a document by defining branches, nodes, and properties.
Useful properties of the DOM are:
- ContentType: what kind of file this is (application/pdf, image/png, etc)
- DocumentID: name of the file
- Length: length of the file as an integer
- Pages: list of the pages in the file
At the end of the Digitization step, we can see that DU automatically sensed whether it was an image or a native text document. If it was an image, DU used OCR to translate it into text and a DOM object. These two outputs are then passed along to the next step.
Step 3: Classification – What Type of Document?
Up to this point, we have told the DU what to extract from each type of document (taxonomy), and have turned the document into a DOM that it can read (digitization). Because in our example case we will be processing both invoices and receipts, we have to do the optional step called Classification. Classification is only necessary if we are processing more than one kind of document, and have to teach DU how to tell different documents apart. We humans would naturally scan the document looking out for some words like “Invoice”, “Receipt”, “Balance Due”, “Total Paid”, etc. Classification is teaching DU to do the same.
Classify Document Scope
In our workflow, we add the Classify Document Scope activity and pass in all the variables we have collected so far: the taxonomy, the document file path, the document text, and the DOM.

Next, we must teach the DU how to align this document with the taxonomy.
We do that by giving DU one or more Classifiers. There are 3 types of classifiers:
- Keyword Based Classifier
- Intelligent Keyword Classifier
- Machine Learning Classifier
Let’s learn about each of them. To get started, create a new blank JSON file under the DocumentProcessing folder, let’s call it kw_classification.json. This file will store the fields for the keyword classification we are about to define.
Keyword Based Classifier
If we drag in the Keyword Based Classifier into the Classify Document Scope activity, we see this:

In the Learning File Path property we put the path to the kw_classification.json file created earlier. When we click on Manage Learning a wizard pops up:

Here’s where we define combinations of keywords we want DU to scan for, to be able to classify each document. Click Save.
Intelligent Keyword Classifier
Keyword Based Classifier is useful for very straightforward documents, where there is not much variation. The keywords we select are never altered. For that we need to use the Intelligent Keyword Classifier. To use this classifier, a separate JSON file must be set up in the Document Processing folder. Let’s call it ikw_classification.json. Classifiers work differently, and so must have separate learning files. Drag the Activity to the bottom of the Classification Scope. Point the Learning File Path property to our new JSON file.

This classifier still works on keywords but it selects them for you during a training session. To start a training session, click on Manage Learning.
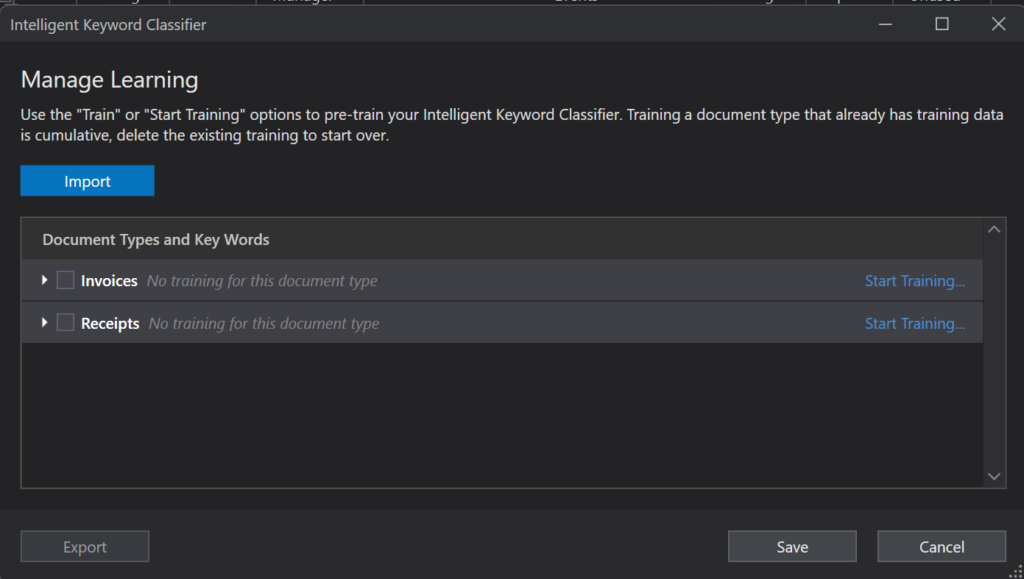
In the pop-up, let’s train an invoice file. Click Start Training on that line. We get another pop-up:

All we have to do here is select the folder icon and then point to one or more invoice files. The classifier will scan each document and collect a list of words from it. Each word will be given a base score. Every time the trainer encounters that word again in another training document, that word’s score will increase. We’ll see how to continually train this classifier within our workflow shortly.
Machine Learning Classifier
Finally we use real Machine Learning technology, pre-trained to recognize patterns in the document. To use the Machine Learning Classifier, it must be set up in AI Center and be pre-trained. To learn more about the AI Center see here. There are out-of-the-box pre-trained models available for document classification of a wide range of standard business documents: invoices, receipts, purchase orders, tax forms, etc. But if none of them or the other classifiers don’t do the job, you can set up and train your own ML Classifier model.
Setting up a custom ML Classifier in AI Center is, as of 2024, still a bit of a pain. This is because it must be set up, trained and validated first from Studio, before it can be turned into an ML Skill that can be used in an automation. You cannot just create folders directly in AI Center and upload the training documents there. For some reason, you must upload them from a process run in Studio (using the Machine Learning Classifier Trainer activity), which creates the folders and uploads the documents to the AI Center, and then which you must link to your taxonomy using the Configure Classifier form. Only then, after the documents have been uploaded into folders on AI Center, you can create a pipeline and train the ML Skill.
Of all the steps in DU, I found this the most complicated. Here is the best video I could find on how to set up and train an ML Classifier:
https://www.youtube.com/watch?v=k3GD5L7mmRs&t=0s
In order to use this classifier, a special type of ML Skill must be created (a regular ML Skill won’t work). This is created from the DocumentClassifier package which is a bit difficult to find in the AI Center. To find it follow this trail:
ML Packages > Out of the Box packages > UiPath Document Understanding > DocumentClassifier
Configure the Classifiers
Once we have at least one classifier, we need to configure it. This tells DU which type of classifier to use for each type of document. In the Classifiers Scope Activity, click on the Configure Classifiers link to open a form.
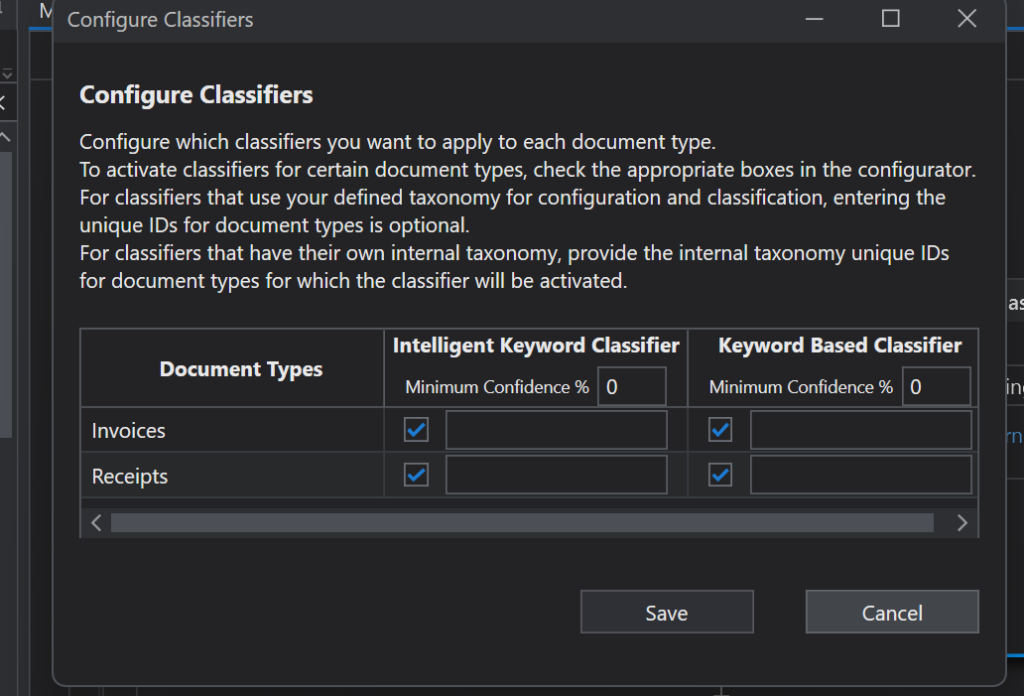
Simply checking the boxes links the classifier to the types of documents. So, we could use different classifiers for different document types if we wanted. For the Machine Learning Classifier, the name of the folder of the dataset in AI Center must also be typed in beside each type of document.
Classification Scope Output
The output of the Classification Scope is a read-only array of type ClassificationResult[]. Why an array? Some documents may fall under several categories. A confidence score would be returned with each one. Each object contains useful properties such as:
- DocumentTypeID: corresponds to the taxonomy type (invoice, receipt)
- DocumentID: file name of processed document
- ContentType: type of content contained in document
- Confidence: confidence of correct classification – 0 to 1
- OCRConfidence: confidence of correct character identification – 0 to 1
- Reference and DocumentBounds: these tell what it was scanning for and where it was found
- ClassifierName: name of the classifier used
TRAIN THE CLASSIFIERS
Set a Condition
Now we have the output of the Classification Scope, as seen above. Notice the Confidence property. This important property tells us how much we should trust the classification, expressed as a Double. The number 1 would be 100% confident. Let’s set a minimum of .8 to proceed to the next step. We do that by creating an if-else activity and setting the condition varClassificationResults(0).Confidence < .8
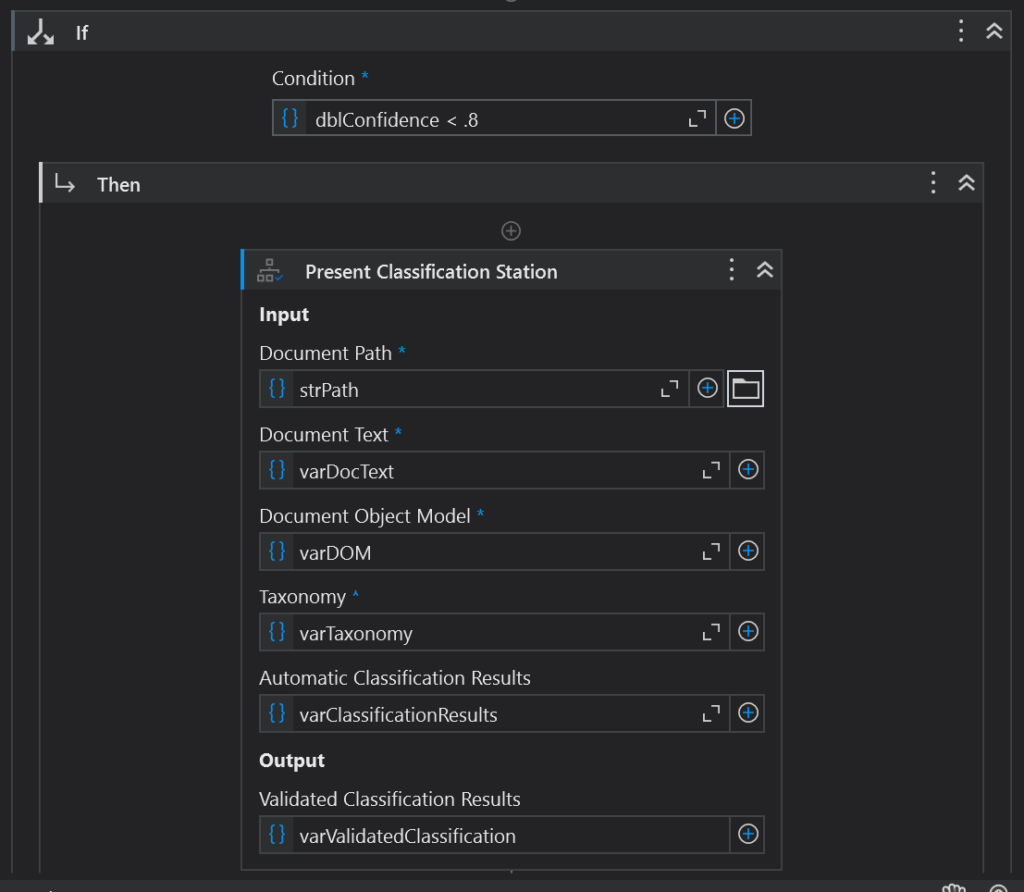
Get The Human Involved
In the Then section we add the Present Classification Station Activity. It will open a dialog with the user, present him/her with the whole document and ask if its classification is correct. It will look like this:
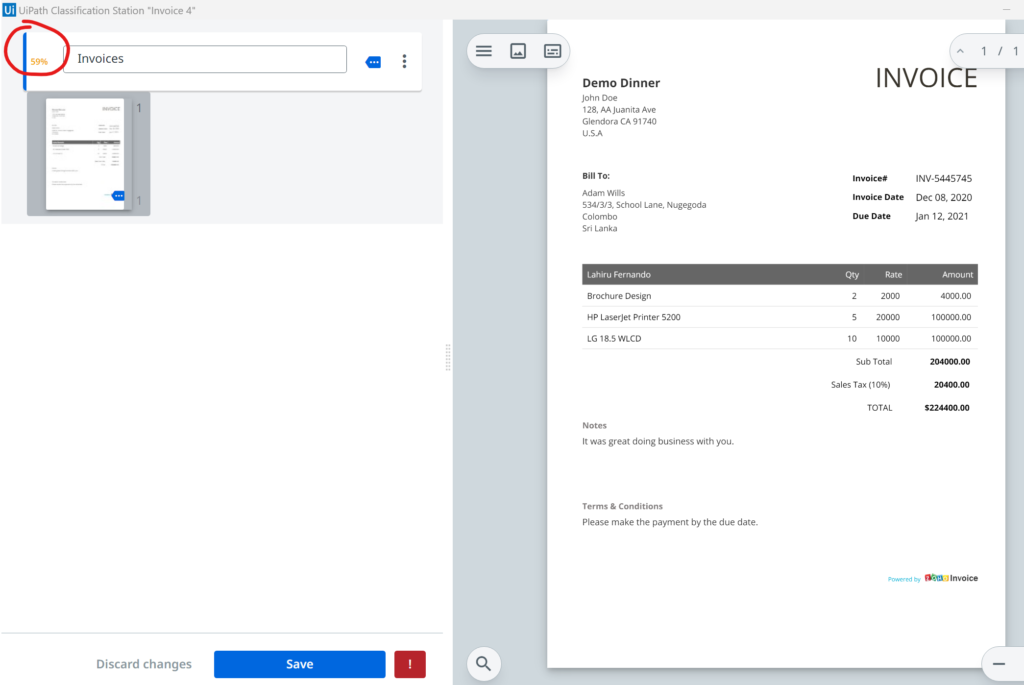
Notice the upper left corner. DU is guessing that this document belongs under Invoices, but its confidence is only 59%. As soon as the human clicks Save, a new object is created of type ValidatedResults[] which we stored in a variable called varValidatedClassification. Now we can use this validated result to help the classifier learn its lesson for next time.
Train Classifiers Scope
The first step is to bring in the Train Classifiers Scope Activity. This is very similar to the Classification Scope Activity. The only difference is there is now a place for our human validated results as output from the Present Classification Station activity.
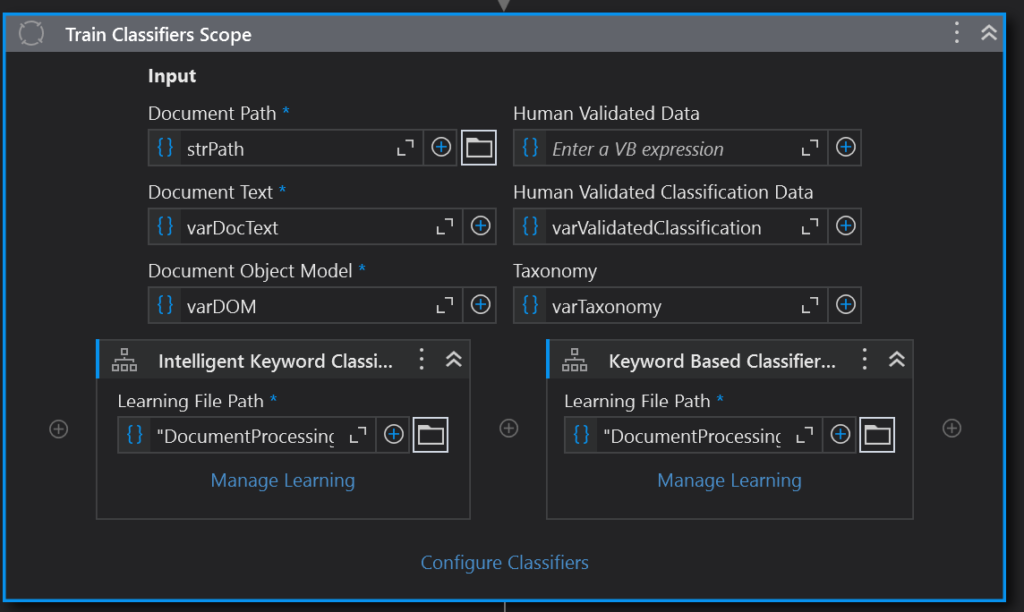
This time we drag the Classifier Trainers to the bottom of the Train Classifiers Scope activity. Again, we put in the learning (JSON) file that we set up for each one. Clicking on Manage Learning will bring up each classifier’s wizard again, if we want to modify the keywords or do some more training. But we already did this in the Classification step. Once again, we have to click on Configure Classifiers, to tell DU which classifier to train on which type of document.
How Classifiers “Learn”
Each Classifier learns a bit differently. The Keyword Classifier doesn’t actually add to its keywords, you must do that manually. But it makes its confidence score 100% once a human has done the validation. The Intelligent Keyword Classifier adds to its keywords with every document processed, and with human validation it changes the relative weights of the keywords. Therefore, it “learns” which keywords actually worked better. The Machine Learning Classifier uses a pre-trained, labeled model to define and recognize patterns. Then, during retraining, it fine-tunes and adapts its pattern recognition.
To Classify or Not to Classify?
There are a couple of things to remember about the classification step. Unless the business use case involves processing different types of documents all at once, classification may be more trouble than it is worth. All classification does is differentiate between different kinds of documents. Also keep in mind that classification takes time and may cost money if the AI Center is used. It may be easier to simply load different types of documents into separate folders or queues for processing, and create separate workflows for each type of document, or pass along the type of document as an argument to a combined workflow for processing. To skip classification, we would pass the full path in the taxonomy to the DocumentTypeID property like so: “AccountsPayable.Unpaid.Invoices”.
Step 4: Extraction — Get The Data
We’ve got the DOM in memory, and we know what type of document this is so we are pointed in the right place in the taxonomy (or we skipped classification and will just pass in the DocumentTypeId from now on). Now we can finally get the data we want from the document, called Extraction. Just as with classification there are various methods doing this.
Data Extraction Scope
We start by adding the Data Extraction Scope to our workflow and we fill in the variables we have in memory so far, along with a new variable to hold the Extraction Results. Remember, the classificationResults fetched from the previous step came in as an array, so we fetch the first element in that array — element 0. If we used the human to validate the classification, our input would be varValidatedResults, also an array of the same data type. It might be easier to assign the DocumentTypeId (String) to a separate variable before and after the validation to pass in to this step.

To the bottom we add our extraction activities.
RegEx Based Extractor
A Regular Expression is a specific sequence of symbols and characters used to quickly match text. It looks like gobbledygook to most of us, but computers like it. For example, the RegEx for finding a Date field might look like this:
\bDate:\s*([0-9]{1,2}\/[0-9]{1,2}\/[0-9]{2,4})\bRegex is complicated. It takes a lot of time to get good at putting together RegEx patterns. The documentation for the RegEx Based Extractor itself is rather long. You can find it here.
To help us out, UiPath gives us a RegEx wizard to experiment with until we get the right match for each piece of data we are looking to extract. Fortunately, the internet is full of accepted RegEx patterns used to extract all kinds of text like emails, phone numbers, zip codes, etc. The RegEx Based Extractor does give developers fine-grained control over what it extracts, once they get the pattern right. This type of Extractor cannot be used in a continual learning loop. For that we need an AI-based extractor.