TDD in UiPath – A Walkthrough – Part 3
Part 3 in a Series – Part 1 – Part 2
In the last post, we set up a file structure to demonstrate how we can develop a workflow using Test-Driven Development (TDD). As a review here’s what we’ve done so far:
- Isolated our Unit by creating a separate folder
- Created a test data file in Excel
- Created a Workflow file and a Test Case from it
- Created and linked our arguments, in both the workflow file, and the Test Case file
- Added a simple Verify Expression activity in the Test Case
Continuing where we left off, in this post we will learn how to run some tests, watch them fail, and then start to code to get the tests to pass.
Step #6: Run our first Test
Open the Test Explorer panel. Let’s examine this to see what it tells us.
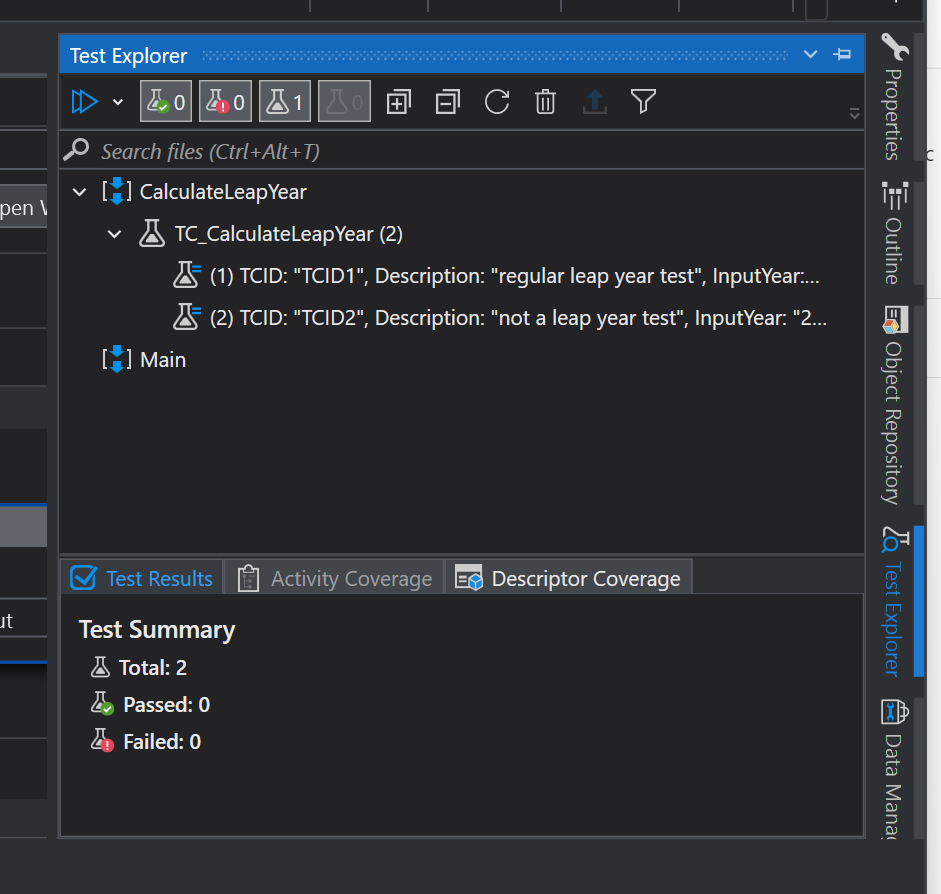
From the top we see our CalculateLeapYear (our workflow file). Under that we see the name of our Test Case file, which we called TC_CalculateLeapYear. And underneath that, we can helpfully see our 2 test cases from our data file, which even shows the values of our columns! We also see the Main xaml file, but since we don’t have any Test Case file attached, there is nothing underneath it.
In the bottom section we see the Summary results of any tests cases that we have run.
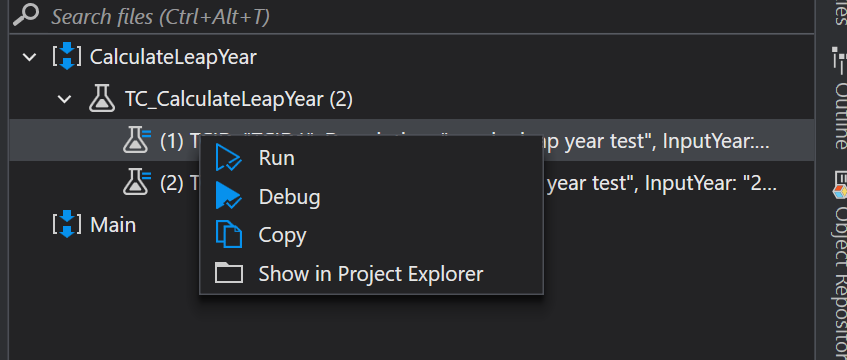
Right-click on the first test case (TCID1). A popup menu will show. Click on “Run”, and let’s see what happens.
The first thing we notice is the Output Panel shows that the test failed in red.
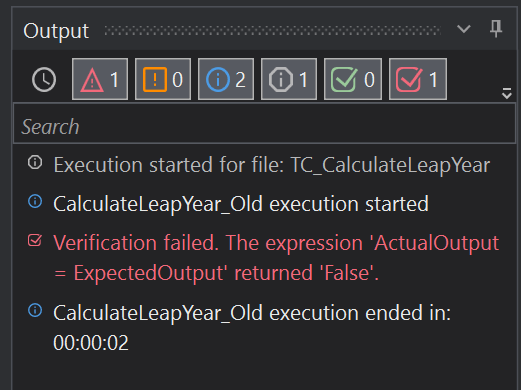
It just says ActualOutput = ExpectedOutput returned False. Ok, but that’s not very informative is it?
But look over at the Test Explorer panel.
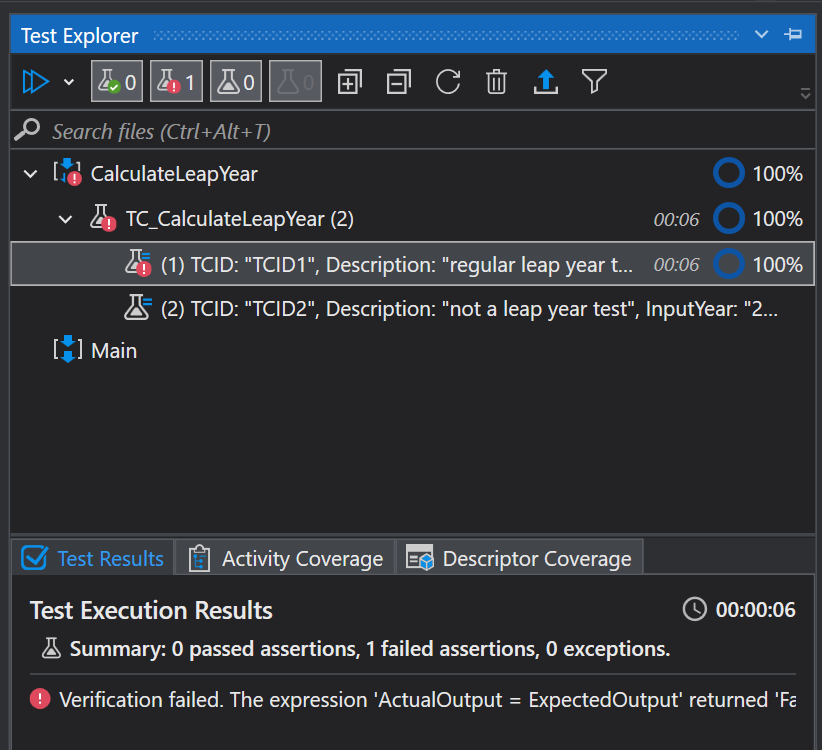
We see that our test failed, we know exactly what case and inputs failed. If we hover over the failing test case, we are presented with helpful details about the inputs from the data file that failed, and since we put the ExpectedOutput in our data file, it pops up too. It even shows us the execution time of the test case and the coverage percentage.
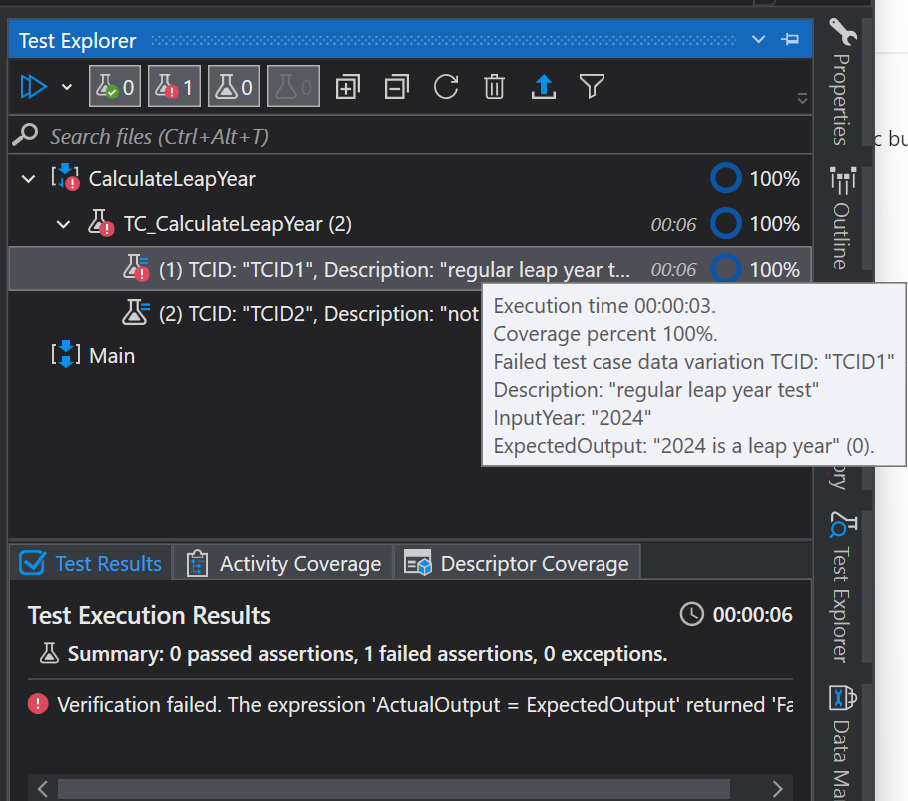
The only thing that’s missing that would be very helpful is adding the ActualOutput, what the result is coming from our code execution. So let’s fix that now.
Step #7: Make test messages more helpful
In the Test Case file, in the Verify Expression activity, there is a property called OutputMessageFormat, where we can override the unhelpful message we saw earlier in the Output Panel. Let’s open that property in the Advanced Editor and type in this:
"InputYear: " + InputYear + vbcrlf + "ExpectedOutput: " + ExpectedOutput + vbcrlf + "ActualOutput: " + ActualOutputThis will put all the important info right there in the Output Panel on each test, and add some carriage returns to make it easier to read. Now, let’s rerun the 1st test case and see what happens.
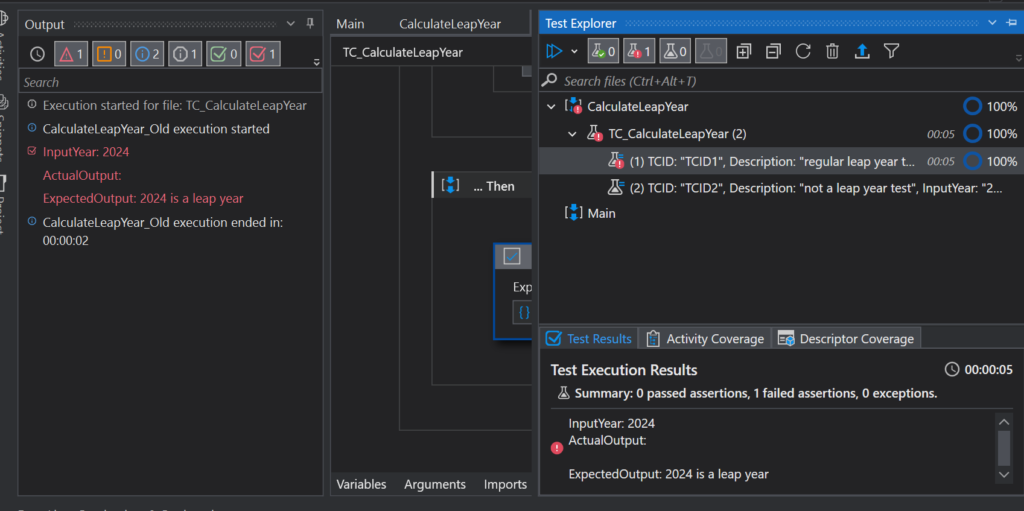
Woohoo! Now we’re getting somewhere! Now we can see helpful message in both the Output Panel (on the left on my screen in red) and also on the Test Execution Results section of the Test Explorer Panel!
Step #8: Write code to make test pass
An experienced developer can probably already see how to write this code to handle potential errors. But since this is a walkthrough for novices, let’s take it one step at a time, without putting in error handling yet.
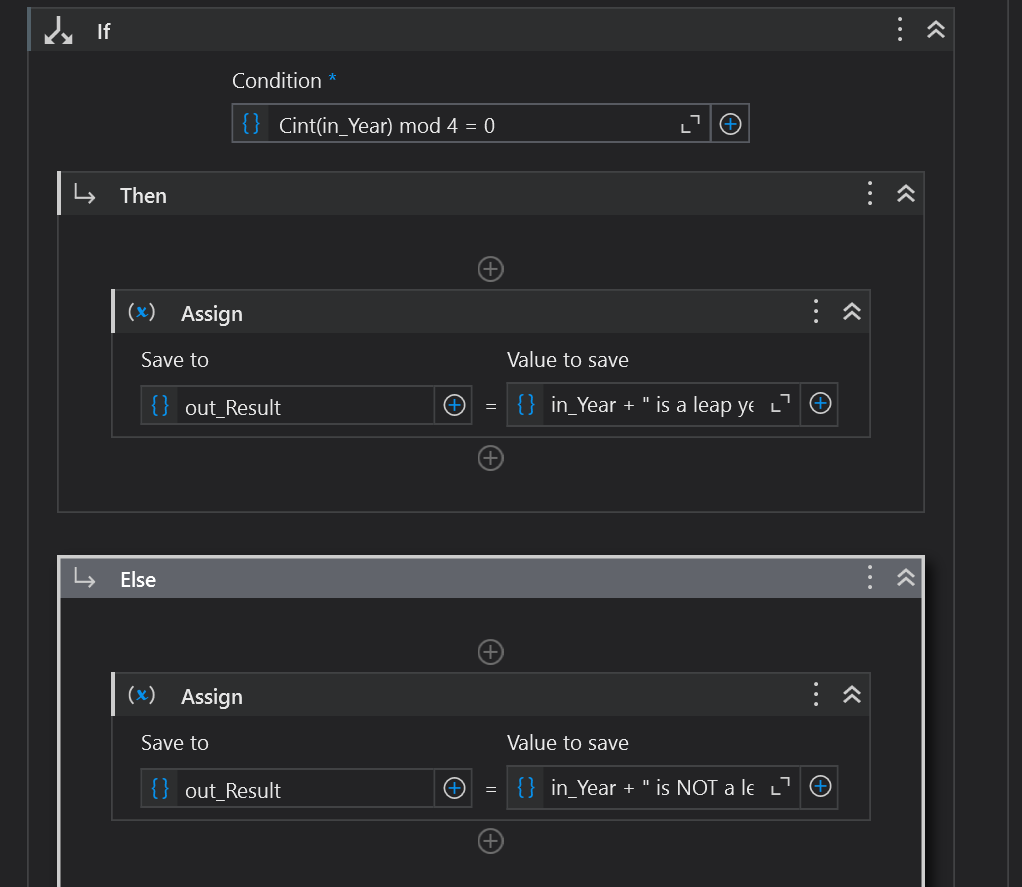
The calculation for a leap year is that the year must be evenly divisible by 4. Here’s the calculation:
in_Year mod 4 = 0So let’s put that in our workflow. Let’s try an IF statement with the condition above, and then assign to our out_Result argument for each case, true (in_Year + ” is a leap year”) and false (in_Year + ” is NOT a leap year”). The first thing we discover is that our input is a String data type and so we must convert it to Integer first in our condition. So here’s what it will look like:
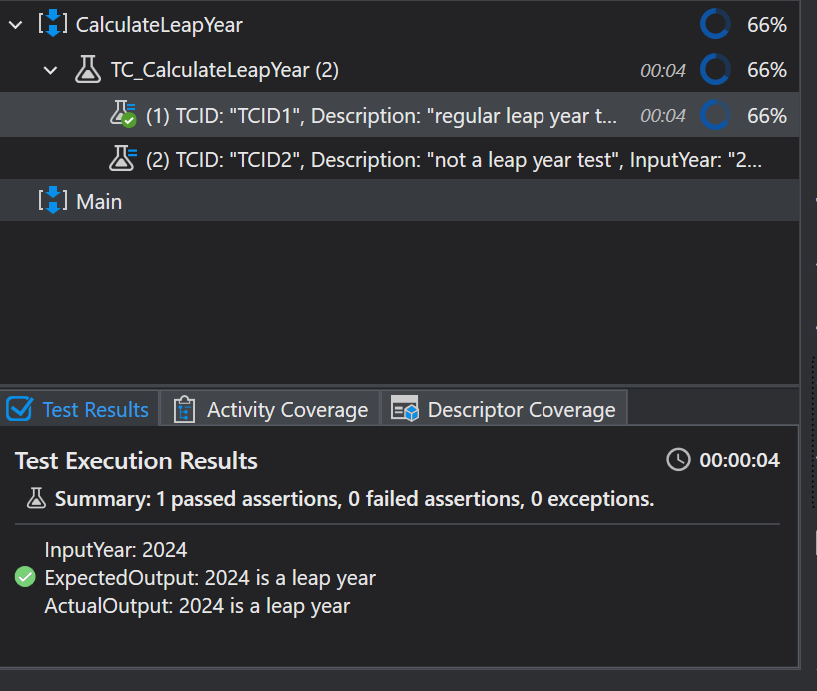
Let’s run our 1st test again. Here’s what we get now.
Step #9: Run second test case
If we run the second test case now, we see that it also passes, because we already coded the “NOT a leap year” case in our if-else statement. In the traditional TDD method, that would be a bad thing. I disagree. If an experienced programmer can handle many cases with a single line of code, why shouldn’t she?
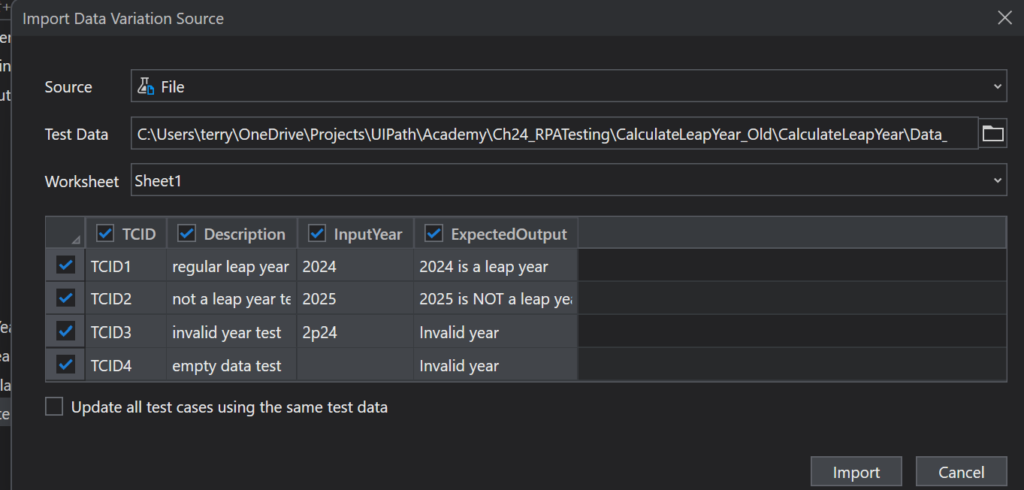
Step #10: Add additional test cases to data file
The beauty of this setup for TDD, is that we can continually add to our Test Data Excel file, and keep running all our test cases at once, to see what fails. Before we learn how to do that, let’s add some complexity to our scenarios, which we noticed as we wrote our condition statement in the If-Else. Let’s say that someone passed in a typo, a string that can’t be converted to an integer. What should happen? The calculation cannot proceed, so it should return “Invalid year”. And, while we’re at it let’s add a case for if the string is completely null or empty too.
Let’s add these scenarios to our data like so:

When we first created the Test Case and set the data source, that data was IMPORTED (not linked). So when we make a change to this data, we need to reimport it. To do that, in the Project Panel right-click on the TC file and select Update Test Data. Reselect File from the Source dropdown, and repoint to our Data file. Once again, our data pops in, this time with our new rows. Click Import to close.
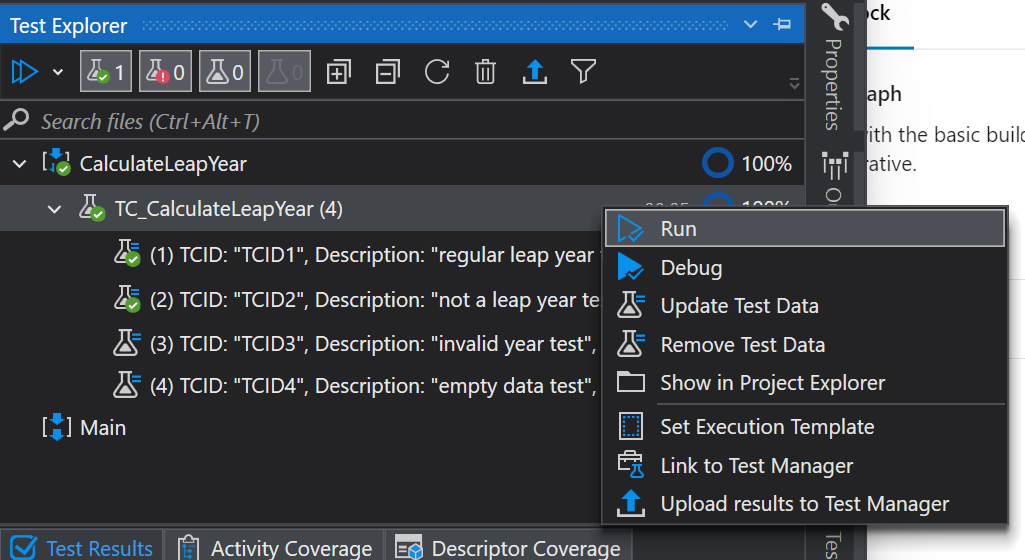
Step #11: Run all tests at once
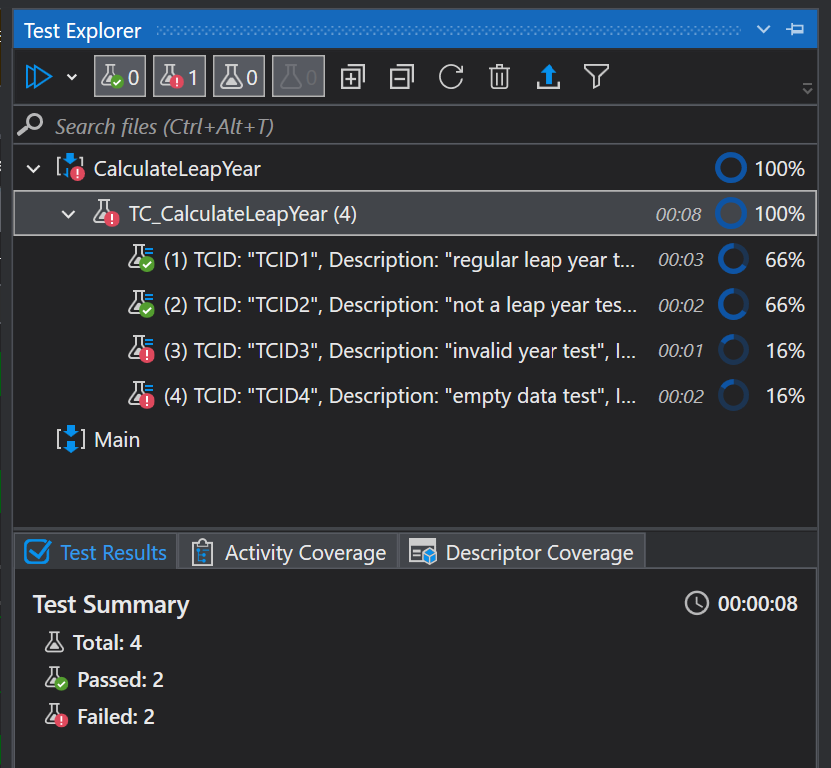
Now let’s learn how to run all tests, to see what passes and what fails. This is helpful, because as we know, sometimes we make a tiny change to a codebase, and it breaks something that was previously working! In Test Explorer, instead of right-clicking on a single test, right click on the whole TC file, and select Run. This will run the test separately for each row underneath it.
As expected, our last 2 tests fail.
Step #12: Fix the code again
Let’s fix these failed tests. We know that these errors come from the CInt function that converted our input to an Integer. Let’s handle this. Let’s surround our if-else activity with a try catch, and see if we can catch that error.
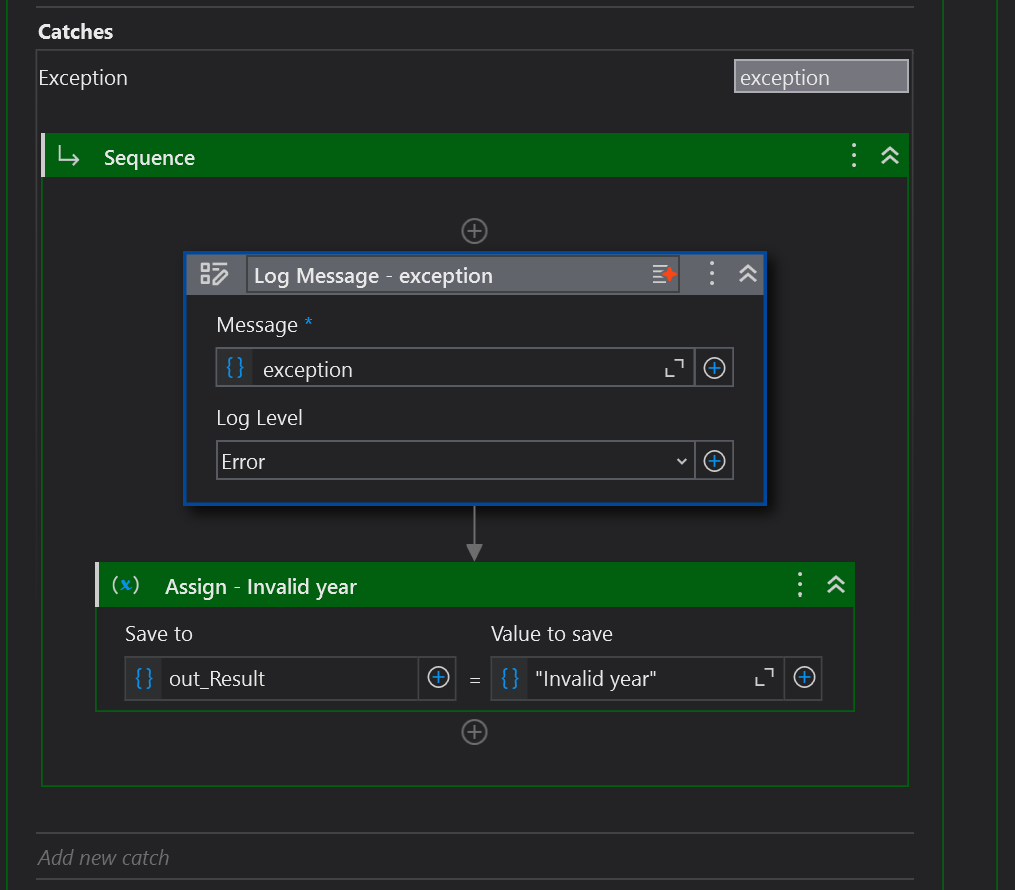
We first log the exception that is raised, in this case it is the System.InvalidCastException. This is helpful for us if we want to react to different exceptions differently. In this case though, let’s just react to any kind of exception at all, the generic System.Exception. When we have any kind of exception, we’ll just output our generic “Invalid year” string.
Step #13: Rerun all the tests again
Now when we rerun all the tests. They all pass!
Step #14: Refactor
As you add more and more test cases and get them to pass, your code may become a bit convoluted. An important step is to look at the code, optimize it for speed and clarity, and see how it can be more efficient. This is called refactoring, and it separates the professionals from the amateurs. Remember to run all the tests again after any change!
What We’ve Learned
So if you’ve walked through all these steps, you should now see how easy Test-Driven Development can be for Unit Testing in UiPath Studio. With a simple Excel spreadsheet for our Test Data, we can write scenarios to handle as many potential problems as we can think of. Using UiPath Studio Test Cases and Test Explorer, we see how easy it can be to structure tests, run, and re-run them after we make changes to the code. We easily can run a single test, or run all of them at once. Most importantly, we can see how easy it is to add test case scenarios before we write the code. Now it’s your turn.
Some Challenges for you!
Now that you’ve learned the TDD approach to development, try these challenges on your own. If you get stuck, you can always email me for help!
Challenge #1: It turns out that there is an exception to the leap year calculation. If a century year (1600, 1700, etc.) is not evenly divisible by 400, it is NOT a leap year. Using TDD, add that scenario to your data, and make it fail then pass.
Challenge #2. Leap year was introduced and decreed by Julius Caesar in the year 46 BCE. So, technically, any year before that should receive a message informing the user of that fact! So, your challenge is to incorporate that new scenario into your code, using TDD, by using negative numbers for the year.
Challenge #3: Add a feature that if the input argument is a string with BC, BCE, CE, or AD, that the code will convert it to the correct year. Be sure to account for spaces, periods, and different cases.
Challenge #4: Upon further research, it turns out that in the beginning, the early leap years were added confusingly. The following years were leap years: 45 BC, 42 BC, 39 BC, 36 BC, 33 BC, 30 BC, 27 BC, 24 BC, 21 BC, 18 BC, 15 BC, 12 BC, 9 BC, 8 AD, 12 AD, and every fourth year thereafter. Using TDD, add some rows to your test data, and then write the code to make them pass.
Challenge #5: There is no year 0 in the Julian Calendar. Return a message informing of that fact.
Challenge #6: Make all the negative years output the suffix “BCE”, which is the accepted term today.
How did you do? Be sure to send me a note and tell me what you think of this challenge!